Acabo de terminar una bolsa de patchwork que me ha encargado una profesora de ballet de mi hija. Había visto la que le hice a Ana hace un par de años y le gustó. Pero como fue una creación propia y no apunté como la había hecho ahora he tenido que empezar casi de cero. Así que esta vez he tomado nota de los pasos que he seguido. Aquí tenéis mi primer tutorial.
I have just finished a patchwork bag that my daughter’s ballet teacher had entrusted me. She had seen the one I made Ana a couple of years ago and she liked it. But, it was an own creation and I didn’t note down how I made it, so now I had to start almost from scratch. This time I’ve made a note of every step I have taken. Here you have my first tutorial.
Ésta es la estructura de la bolsa, con las medidas en centímetros. Hay que añadir dos asas de 110 cm de largo y 3 cm de ancho.
This is the structure of the bag, with the measures in centimeters (1cm = 0.39 in). You have to add two handles 43 inches long and 1.2 inches wide.
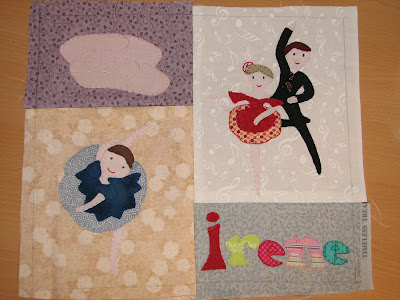
Es una bolsa para llevar el equipo de las clases de ballet, así que ése es el tema. Estos son los dibujos que he hecho (los podéis descargar en PDF
aquí):
This is a bag to carry the equipment of the ballet classes, so that is the topic. These are the drawings I have made (you can download them here):
C
H
B
G
A
Las letras varían según el nombre de la afortunada. Imprimimos los dibujos al tamaño adecuado y elegimos las telas que más nos gusten. Al ser una bolsa es mejor evitar las telas claras en las zonas más cercanas al suelo. La tela del fondo de la bolsa la he puesto más gruesa para que aguante mejor. A continuación cosemos las aplicaciones a punto de festón. Yo utilizo entretela fina especial para aplicaciones de patchwork.
The letters change according to the name of the fortunate. Print the drawings at the right size and choose the fabrics you prefer. As it is a bag it is better to avoid light colour fabrics on the areas close to the ground. I chose a thicker fabric for the bottom of the bag to get support. Then sew the appliques with blanket stitch. I used a special thin interlining for patchwork appliques.
Cuando estén hechas las aplicaciones y cortadas todas las piezas realizamos el montaje.
When the appliques are prepared and all the pieces cut do the assembly.
Planchamos bien las uniones y añadimos una entretela gruesa para darle cuerpo a la bolsa. Se aplica con el calor de la plancha. Hay que cortar tantas piezas de entretela como partes de la bolsa (una para cada cara) y con las medidas indicadas.
Iron the joints properly and add an thick interlining to give shape to the bag. It is applied with the heat of the iron. Cut so many parts of interlining as parts of the bag (one for each side) and with the indicated measures.
Y montamos la bolsa. Aquí comienza la parte más tediosa. A mi me resulta más cómodo unir primero las caras al fondo y después poner los lados.
Then assemble the bag. Here starts the most tedious part. I prefer to join the bigger sides to the bottom first and then add the smaller sides.
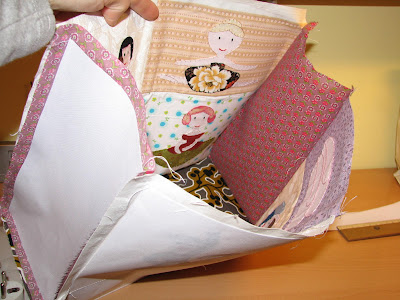
Ahora es el momento de hacer el forro de la bolsa. Hay que cortar piezas del tamaño de los lados, el fondo y la cubierta (que son iguales) y las caras. Y montarlas igual que ya hemos hecho con la bolsa (todas menos la cubierta).
Now it’s time for making the lining of the bag. Cut pieces with the size of the smaller sides, the bottom and the cover (which are equal) and the bigger sides. And after assemble them as have done already with the bag (all but the top).
En la cubierta o parte de arriba de la bolsa, una vez puesta la entretela y cosida la pieza del forro, tenemos que hacer un corte centrado a lo largo para poner la cremallera, que colocaremos entre ambas telas. Como el largo de la bolsa es de 32 cm he puesto una cremallera de 30 cm. Y después unimos esta parte al resto del forro que ya hemos montado.
On the cover or top of the bag, once placed the interlining and stitched the piece of the lining, make a cut along to add the zipper, which you will place between the two fabrics. As the length of the bag is 12.5 inches I have used a 11.7 inches zipper. And then join this part to the rest of the lining that have already assembled.
El siguiente paso es hacer las asas para lo que hemos de cortar dos tiras de 110 cm de largo (depende de la altura de la persona, esto es para una persona de unos 150 cm. de altura) y 6 centímetros de ancho. La entretela ha de cortarse de 110 cm por 3 cm. Se pega con la plancha a lo largo de la tela colocándolo a uno de los bordes y luego se dobla la tela por mitad y se cose del revés. Se le da la vuelta con la ayuda de una aguja de tricotar y/o un pasabiés y mucha paciencia, porque la entretela lo dificulta un poco.
The next step is to make the handles for what we have to cut two strips 43 inches long (depends on the person height, this one is for a person about 5 ft. height) and 2.3 inches wide. The interlining has to be cut 43 inches long and 1.2 inches wide. Stick it with an iron over the fabric placing it in one of the edges and then fold the fabric by half and sew inside out. Turn it with a knitting needle and much patience, because the interlining makes it a little difficult.
Y terminamos uniendo la cubierta (con el forro) al resto de la bolsa, sin olvidar poner en medio las asas. Yo las coloco a unos 7 cm de los bordes exteriores de la bolsa. La bolsa debe estar del revés y la cubierta también. Y se cose todo menos uno de los lados pequeños, por donde se sacará la bolsa para ponerlo todo del derecho. El forro se quedará dentro. El lado que queda por unir se cose ya con la bolsa del derecho a través de la abertura de la cremallera. ¡Terminada!
And finish joining the top (with the lining) to the rest of the bag, without forgetting to place the handles on the middle. I placed them at about 2.7 inches from the outer edges of the bag. The bag must be inside out and also the top. And then sew everything but one of the small sides, where the bag will be put forward through. The lining will remain inside. Then sew the side left through the zipper opening. It’s done!


7 comentarios
Enhorabuena por el tutorial y por la bolsa, ha quedado preciosa.
gracies per el detall de compertir,avui en dia les perones ens estem tornan molt egoistes i no agrada compartir,jo no se penjar coses pero si algun dia necesitas algo ja saps,un correo al meu privat i si ting el que em demanas ja hi pots contar,una abraçada angels
Gracias por tus palabras y por tu ofrecimiento, Angels. Lo mismo te digo. Un abrazo.
Me encanta lo haré no sé cuando peró lo tengo que regalar de aquí a un año. Un tutorial espléndido.
Muchas gracias, me anima que te haya gustado.
Me encanta la bolsa y tu blog.Me quedo por aqui de visita.Bicos
@Maria Estupendo. ¡Bienvenida!