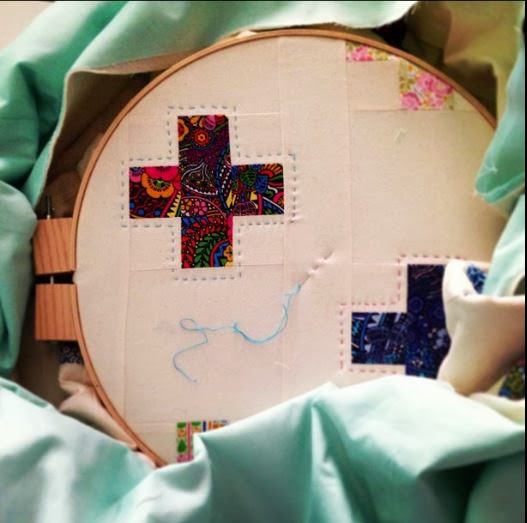
El acolchado es una parte esencial del quilt que cambiará totalmente su aspecto según lo hagamos de una forma u otra: a mano o a máquina, en las costuras o paralelo a las mismas, decorativo con uno u otro dibujo,…
The quilting is an essential part of the quilt that will change totally its appearance depending how we do it: hand or machine quilting, outline quilting or in the ditch, decorative,…
A mi me gustan sobre todo los acolchados sencillos y realizados a mano, pero es un punto de partida muy básico que se pierde cuando veo complejos quilts acolchados a mano.
I like specially the simple and hand quilting, but I love complex hand quiltings too.
1- Existen agujas e hilos especiales. Las agujas son muy finas y los hilos son de algodón y están encerados para deslizarse bien entre las telas y la guata. Pero basta con usar una aguja fina e hilo de algodón fuerte.
1- There are special needles and threads. The needles are very thin and the threads are cotton and waxed so they are easier to pull out between the clothes and the batting. But a thin needle and a strong thread is enough.
3- Se empieza haciendo un nudo que atraviese la tela (trasera o delantera, a gusto) y se quede en la guata.
3- Start making a knot and take the needle down through the backing fabric or the top layer. Pull the thread gently until the knot pops through the fabric but not hard enough to bring it out again.
4- Clavamos la aguja de arriba abajo en vertical y guiándonos con el dedo de la mano izquierda, que permanece debajo del quilt, realizamos varias puntadas en ángulo antes de tirar del hilo. Las puntadas deben ser de la misma longitud y más bien pequeñas, lo que conseguiremos con la práctica.
4- Push the needle straight down until you feel the point with your underneath hand. Push the needle up and down until the needle has as many stitches as it will hold. Pull the thread through and repeat. Try the length of the needle protruding on the top was the same length as the next stitch.
5- Cuando acabemos el hilo lo enrollamos doblemente en la aguja, clavamos hasta la guata y lo sacamos de nuevo dejando el nudo en la guata y cortándolo con cuidado lo más cerca posible de la tela.
5- When the thread is finished, wrap it twice around the needle, insert the needle point into the top layer only, slide the needle within the batting and bring it out. Gently pull the knot through the batting and carefully cut the thread close to the surface.
El motivo del acolchado podéis dibujarlo con rotuladores especiales que se borran con agua o con el calor de la plancha (aunque éstos últimos no me gustan porque se borran con el roce y puede ser una pesadilla cuadrar lo borrado con lo que ya hemos acolchado). Si se trata de hacer rectas también se puede emplear cinta de pintor como guía.
You can draw the motif of the quilting with special pens, water-soluble pens or iron-off marking pens (I do not like these beacuse they easily erase while working on the quilt). If the question is making straight lines you can also use masking tape as guide.
Muchas gracias María por tus recomendaciones, me encanta tu blog! un fuerte abrazo desde Colombia.
@Mar�a Fernanda Tenorio Reyes Gracias a ti por tus palabras. Me alegro de que compartamos aficiones. ¡Un abrazo desde España!
Me gustó muchísimo tu explicación. Como todo lo que publicás en tu blog, nos ayuda mucho a las que apenas empezamos. Muchas gracias! Un beso desde Neuquén, Patagonia Argentina.
@Ceci G. Gracias,Ceci, muy amable. Me siento muy acompañada, tan lejos y tan cerca a la vez.
Un abrazo.


4 comentarios
Muchas gracias María por tus recomendaciones, me encanta tu blog! un fuerte abrazo desde Colombia.
@Mar�a Fernanda Tenorio Reyes Gracias a ti por tus palabras. Me alegro de que compartamos aficiones. ¡Un abrazo desde España!
Me gustó muchísimo tu explicación. Como todo lo que publicás en tu blog, nos ayuda mucho a las que apenas empezamos. Muchas gracias! Un beso desde Neuquén, Patagonia Argentina.
@Ceci G. Gracias,Ceci, muy amable. Me siento muy acompañada, tan lejos y tan cerca a la vez.
Un abrazo.